R
Ryuumi Lifestyle
|
Building the Custom Leverless Controller Unit 02! The Ultimate Customization Based on Lessons from Unit 01
Evolving into a combat-ready controller utilizing a 3D printer and the P2S Combo

Building the Custom Leverless Controller Unit 02! The Ultimate Customization Based on Lessons from Unit 01

Evolution from Unit 01 to Unit 02: 5 Key Improvement Points

After upgrading from the Adventurer 3 to the P2S Combo, the first custom leverless controller (Unit 01) was finally completed. However, upon actually using the finished product, I noticed several flaws. The true joy of DIY gadgets lies in the trial-and-error process itself. This time, we will reveal the full picture of 'Unit 02,' which was redesigned by identifying the fatal flaws discovered through extensive use of Unit 01.

The table below summarizes the issues Unit 01 faced and the specific solutions implemented in Unit 02. In this article, we will dive deep into how these five updates have changed the actual usability.
Comparison ItemIssues with Unit 01 (Old Model)Improvements in Unit 02 (New Model)
Button Replacement StructureSandwiched with the top plate, making replacement hopelessIndependent holes + adjustment rings enable individual replacement
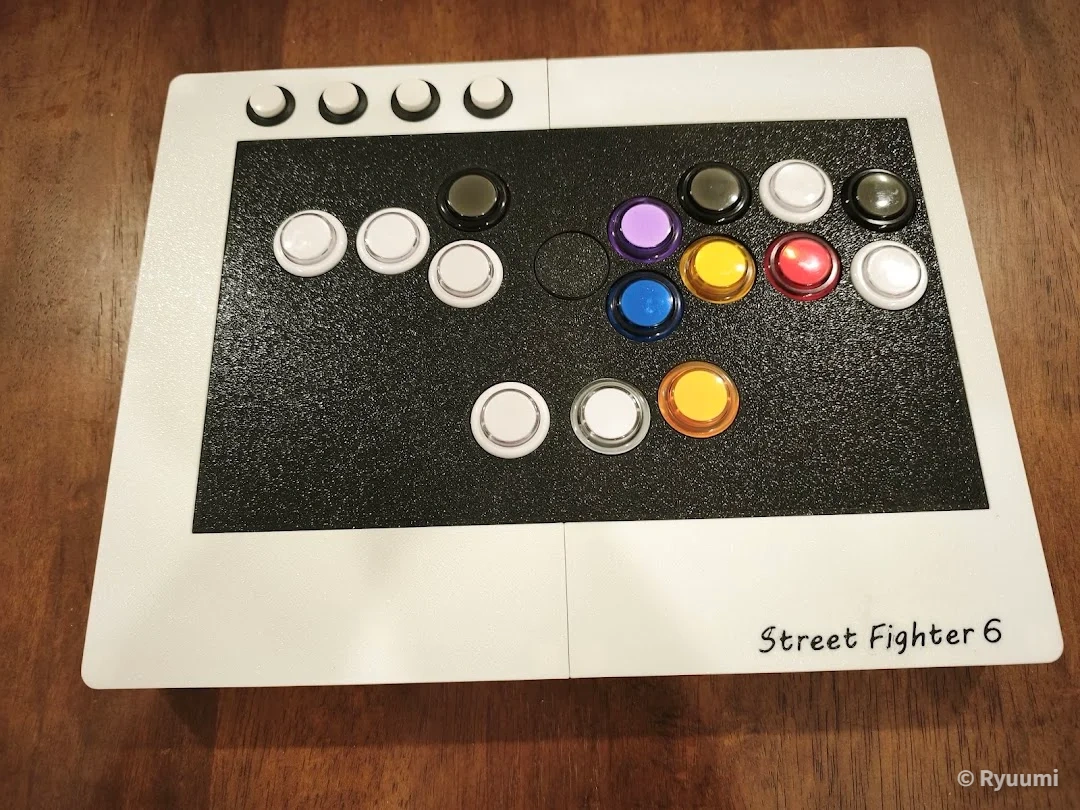
Button Layout5 unnecessary 16mm buttonsReduced 16mm to 4, added a new 24mm for the left hand
USB ConnectionDedicated screw-on connector (high cost, hard to get)General-purpose adapter + cable for cost reduction
Case RigidityFlexes when pressing the sides (negatively affects operability)Added ribs to the bottom plate, achieving solid rigidity
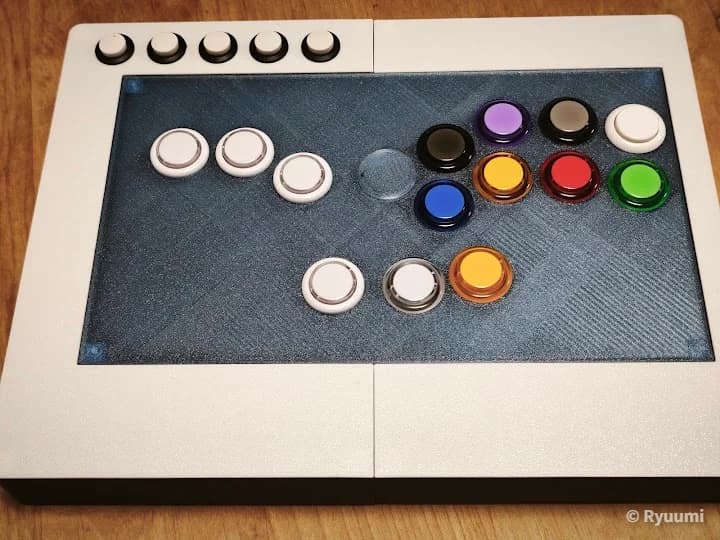
Top Plate CustomizationRequires full disassembly, practically impossibleEasy attachment/detachment with M3 screws, change colors on a whim

Button Replacement Structure: From Top Plate Sandwiched to 'Independent Holes + Adjustment Rings'

The biggest failure of Unit 01 was its hopelessly poor maintainability when replacing buttons. By making the hole size of the top cover the same as the top plate, it resulted in a structure that sandwiched the cover along with the buttons, forcing a complete disassembly just to test a single switch. In an arcade controller, 'difficulty of maintenance' is nothing short of a fatal flaw.

Therefore, for Unit 02, we expanded the hole diameter of the cover while custom-molding dedicated rings with a 3D printer to compensate for the height. By inserting this ring between the button and the top plate, we were able to keep the height completely flat while securing it independently from the cover.

As a result, the cover can now be removed with the buttons still attached, drastically lowering the hurdle for cover replacement.

Button Layout: Reducing Unnecessary 16mm Buttons and Adding a Practical Left-Hand Button

Next, we tackled the highly inefficient button layout. Unit 01 had five 16mm buttons lined up at the top, but in a PC (XInput) environment, only 'Back' and 'Start' are actually used. It was a complete waste of resources. In Unit 02, we downsized this to four and fully allocated the freed-up space and resources to adding a 24mm button for the 'left thumb/index finger.'

When diving into ranked matches in 'Street Fighter 6,' the response time for split-second Parries or Impacts determines victory or defeat. By placing a function button on the left side, the burden on the right hand has drastically decreased, and input errors have visibly reduced.

The greatest strength of DIY is the ability to physically construct 'your own optimal solution' that isn't available in commercial products. We stripped away unnecessary buttons and relocated them to where they are truly needed. The appearance has also become sleeker, evolving into a controller more specialized for actual combat.

USB Connection: Eliminating Dedicated Connectors for Massive Cost Reduction with General-Purpose Parts

We also aimed for thorough cost-cutting and generalization for the interface from the internal board to the outside. The screw-on Type-C connector for panel mounting used in Unit 01 was unnecessarily expensive at about 900 yen each, and it was hard to procure. The risk of not being able to immediately get a replacement in the event of a disconnection or other trouble is a major hindrance for a device that is used heavily.

Therefore, Unit 02 transitioned to a combination of a ubiquitous 'Micro-B to Type-A cable' and an inexpensive 'Type-A to Type-C adapter.' This significantly reduced the cost of parts. By repurposing an old spare cable, it can be built for practically nothing.

Furthermore, we designed the opening on the case side to be wider and adopted a structure that fills the gap with a separately 3D-printed spacer. Even if we switch to a different connector standard in the future, we only need to remake the spacer. It is an extremely rational update that balances cost and expandability.

Case Rigidity: Completely Overcoming Side Flexing with 'Bottom Plate Rib Additions'

The rigidity of an arcade controller directly affects the quality of the keystroke feel. Unit 01 had weak side fixation, and when force was applied during matches, the case would flex, significantly distracting from gameplay. 'Distorting when pressed' is out of the question for a device.

To overcome this vulnerability, we fundamentally revised the design of the bottom plate for Unit 02, integrating sturdy 'ribs (reinforcement protrusions)' during the molding stage to withstand side pressure. This is an approach unique to 3D printers, boosting only the strength without increasing the number of parts.

Even when assembled and pressing hard on the sides, it doesn't budge. By achieving a solid rigidity comparable to high-end commercial models, unpleasant resonance sounds during hard button presses are suppressed, and the keystroke feel has evolved to another dimension. If you seek a stable playing environment, this rigidity upgrade is absolutely essential.

Top Plate Customization: Easy Replacement with M3 Screws, Enjoying Low-Cost Customization

Lastly, I want to touch upon the top cover customization gimmick. Cover replacement, which was hopeless in Unit 01, can now be enjoyed purely as a 'dress-up part' thanks to Unit 02's independent button structure and highly rigid case.

The newly designed cover is extremely lightweight, with the main part weighing about 41g and the left and right parts about 24g each. Since it is secured with a few M3 tapping screws, it can be instantly attached or detached with a single screwdriver. Because it consumes little filament, it's great that you can print various color variations just to test them out.

You can go for a chic black-and-white two-tone look, or use translucent materials to reveal the internal structure for a geeky vibe. Being able to change the appearance depending on your mood for the day is a privilege exclusive to DIY machines, not found in off-the-shelf products. The entertainment value that satisfies the desire for ownership is also an indispensable element for gadgets.

A Combat-Specialized Masterpiece Born from Uncompromising Trial and Error

Taking the failures of Unit 01 seriously, Unit 02 was fundamentally redesigned from the ground up. Maintainability, practical operability, cost performance, and customizability. In every aspect, it has achieved a level of evolution that threatens high-end commercial models. If you have a complaint, you fix it yourself—this overwhelming freedom is the true essence of DIY devices.

Related Articles

The Road to Building a Custom Leverless Controller with a 3D Printer: Prototyping and Limits with the Adventurer 3
Tech

The Road to Building a Custom Leverless Controller with a 3D Printer: Prototyping and Limits with the Adventurer 3

Determined to build a custom leverless controller, I faced repeated failures due to the build size limits and aging of my beloved Adventurer 3. This article thoroughly explains the hurdles of printing a large enclosure and the journey of upgrading to the latest 3D printer.

6 min read
Read
Why I Decided to Upgrade from the FlashForge Adventurer 3 to the Bambu Lab P2S Combo
Tech

Why I Decided to Upgrade from the FlashForge Adventurer 3 to the Bambu Lab P2S Combo

Facing the limits of my long-loved Adventurer 3, I decided to make the leap to the Bambu Lab P2S Combo. This comprehensive guide explores how it resolves the 'real-world operational stress' that doesn't show up on spec sheets, complete with a thorough comparison against competing machines.

8 min read
Read
Is the F1 Honda PU Okay? Decoding Aston Martin's Current Position from the 2026 Season Opener Telemetry
Tech

Is the F1 Honda PU Okay? Decoding Aston Martin's Current Position from the 2026 Season Opener Telemetry

What is the cause of Aston Martin Honda's severe slump? We compared them with Mercedes and Audi using official F1 telemetry to calculate how much power is being restricted and how much time could be gained once the issues are resolved.

8 min read
Read