
R
Ryuumi Lifestyle
|
In Pursuit of Uncompromising Control: Building a Combat-Ready Custom Leverless Controller with the Bambu Lab P2S
A case design that pushes the Bambu Lab P2S Combo to its absolute limits. A build documentary for hardcore gamers, sharing every success and failure without holding back.

In Pursuit of Uncompromising Control: Building a Combat-Ready Custom Leverless Controller with the Bambu Lab P2S

Basic Specs and Configuration of the First Custom Leverless Controller

Let's first outline the overall configuration of this first unit. If you're aiming for a controller that surpasses commercial products, simply throwing parts together won't cut it. I focused relentlessly on three key aspects: maintainability, rigidity, and expandability.

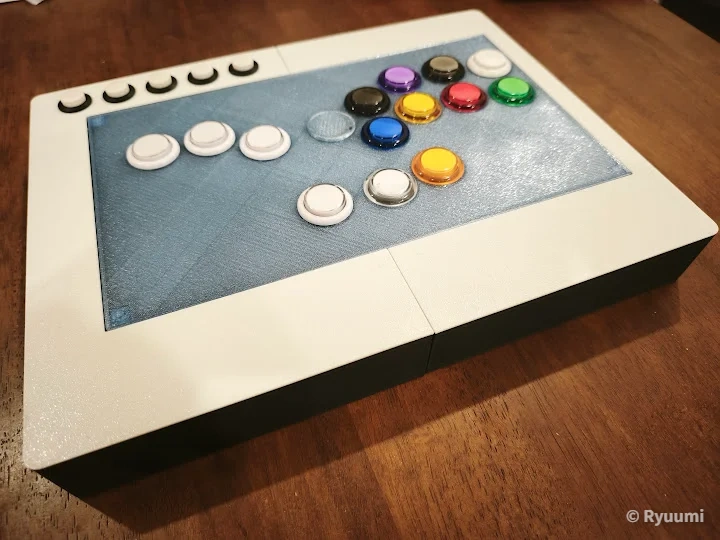
The table below details the main components used and the reasons for their selection. For the brain (control board), I chose the Raspberry Pi Pico, which boasts overwhelmingly low latency. For the buttons, I primarily used Seimitsu 24mm buttons, offering an excellent balance of cost performance and proven reliability. The case itself was printed using the Bambu Lab P2S Combo, with the main button section designed as an independent part to allow for future layout changes.

ItemSpecs / Parts UsedReason for Selection / Features
Control BoardRaspberry Pi PicoOverwhelmingly low latency and great cost performance. Perfect compatibility with GP2040-CE firmware, though the terminal layout requires some ingenuity.
Main ButtonsSeimitsu 24mm ButtonsAffordable yet provides a solid keystroke feel. The slightly longer stroke compared to high-end models is noticeable, but it's more than sufficient for a test unit.
Sub ButtonsGeneric 16mm ButtonsUsed for menu operations. Bought in bulk to cut costs, but poses a risk of accidental presses during actual gameplay.
Case MaterialPLA FilamentBalances print precision and rigidity. The split structure of the bottom and top plates makes internal access easy.
External ConnectionUSB Type-C AdapterEssential Type-C integration for modern gaming environments. However, procurement costs and future availability remain a concern.


Based on this setup, what obstacles did I face during the actual assembly, and how did I overcome them? In the following sections, I will explain the gritty, step-by-step build process with an eye toward real-world combat.

Case Design Obsessions: Reinforcing the Top Plate to Eliminate Flex

In fighting games, case flex when hitting buttons hard directly leads to execution errors. This is a point where I absolutely could not compromise. For this case design, while fully utilizing the 256mm square build plate of the Bambu Lab P2S Combo, I spent the most time ensuring rigidity.

Initially, I tried a design that ran ribs (reinforcing beams) across the back of the top plate to suppress bending. However, simulations and test prints revealed that it was impossible to fully absorb the stress of intense pianoing or plinking inputs with ribs alone. So, I did a 180-degree pivot and changed the design to a brute-force approach, physically supporting the top plate with multiple 'legs' extending down to the bottom plate.

Because of this decision, PLA filament usage jumped to about 114g, and print time was significantly extended. But the payoff was immeasurable. The legs, sitting flush against the bottom plate, completely kill any flex in the top plate. No matter how violently you mash, it doesn't budge, achieving a rigidity that rivals high-end commercial arcade sticks. If you want stability in actual matches, don't skimp on print time. Direct reinforcement via support legs is the optimal solution.

Threaded Inserts and Magnetic Structures for Dramatically Improved Maintainability

The fatal flaw of 3D printed parts (PLA) is the durability of screw holes. If you screw tapping screws directly into the plastic, the threads will strip after just a few openings and closings. For a custom arcade stick that assumes frequent maintenance, this can be a fatal blow. Therefore, for this unit, I adopted heat-set brass threaded inserts to join the case and the bottom plate.

Here's a quick tip: for a 4.1mm diameter nut, intentionally design a tight 3.8mm pilot hole. By pressing it in while applying heat with a soldering iron, the surrounding PLA melts and bites firmly into the nut, creating a rock-solid thread. Furthermore, to connect the two-part case, I combined temporary screw fastening with clamping from the bottom plate, achieving a seamless, rattle-free unity.

Another obsession was the interchangeable top plate design gimmick. I printed a separate 1mm thin cover and incorporated a structure that snaps into place using neodymium magnets. By embedding magnets in the case with epoxy adhesive and installing iron screws in the cover, the top plate could be attached and detached without tools. ...Or so it was supposed to be, but this gimmick would later lead to an unexpected tragedy.

Mounting the 'Pico' Control Board and Optimizing Wiring

The installation and wiring of the heart of the controller, the Raspberry Pi Pico. This is another area packed with DIY know-how. Because the Pico's Micro USB port is offset to one side, a simple bracket design makes the board prone to twisting stress when plugging and unplugging the cable. So this time, I took the approach of intentionally reducing the mounting screws to just one and placing the board flush against the case wall. This allows for a robust mount where the physical wall prevents any shifting.

For wiring, I utilized cheap Dupont connector cables (pack of 100) sourced from AliExpress. I kept the Faston terminals as they were on the button side, but boldly cut and modified the GND (negative) side. The Pico has a limited number of GND pins, making it unrealistic to connect the GND of every button individually.

As a solution, I cut out a piece of universal PCB to create a custom GND aggregation terminal and mounted it inside the case. Compared to daisy-chaining, the cable routing becomes visually much clearer, making troubleshooting in the event of a wire break dramatically easier. By routing longer cables along the reinforcing legs that support the top plate, I was able to perfectly prevent them from lifting or interfering inside the case.

Button Installation, the Struggle for Type-C Integration, and Design Pitfalls

Installing buttons is the best part of DIY, but with a 3D printed case, precision is everything. This time, prioritizing cost performance, I used Seimitsu 24mm snap-in buttons. After obsessively repeating test prints, I succeeded in finding the perfect clearance for a satisfying snap fit. There is absolutely no shifting during keystrokes.

On the other hand, the external connection interface gave me a lot of trouble. As a modern gaming device, USB Type-C integration is a must. So I incorporated a panel-mount Type-A to Type-C adapter cable, but this part is surprisingly expensive and options on the market are scarce. It left me with a lingering anxiety about future parts supply (handling discontinued products). Ironically, through DIY, I came to understand why commercial products use proprietary connectors.

Then, in the final stages of assembly, a fatal design flaw was discovered. I made the button holes on the previously mentioned '1mm thin interchangeable top cover' the exact same size as those on the base top plate. As a result, the rims of the buttons firmly held the top cover in place, leading to a self-defeating situation where 'the cover cannot be swapped without removing all the buttons.' It was a bitter mistake that completely killed the convenience of the magnetic mount. This is something I absolutely must fix in the next model.

Finishing the Wiring and Anti-Slip Treatment to Enhance Play Precision

Organizing the wiring after all parts are housed. If you cut corners here, you'll go through hell during future maintenance. With cables crossing from over 10 buttons, the benefit of aggregating the GND to a custom terminal really paid off here. Because I could clearly separate the routing of signal wires and GND wires, I reduced the risk of pinching cables when closing the bottom plate to zero.

Furthermore, just as important as rigidity for actual combat is the 'anti-slip treatment of the main body'. When performing intense inputs, even the heaviest arcade stick will slide around on a desk. Simply sticking on commercial rubber feet with double-sided tape guarantees they will shift and peel off over long play sessions. So this time, I took the approach of placing multiple small dimples, a few millimeters in diameter, during the bottom plate design phase.

I poured a commercial liquid anti-slip coating, which turns rubbery when dry, into these dimples and let it cure. The results are excellent. It formed powerful grip points completely integrated with the bottom plate, providing overwhelming stability that doesn't budge an inch even during intense play right on the verge of desk-slamming. I also custom-made blind caps to plug unused button holes, elevating the overall polish of the product.

Finally Complete! The Finish of Unit 1 and Challenges for the Next Model

After overcoming numerous trials, errors, and troubles, my first custom leverless controller has finally been born. The contrast between the clear surface and the heavy black case is beautiful, and thanks to the overwhelming print precision of the Bambu Lab P2S Combo, the seams of the split case are completely unnoticeable. The crucial keystroke feel and rigidity have reached a level that can go toe-to-toe with commercial high-end models in the $200+ class.

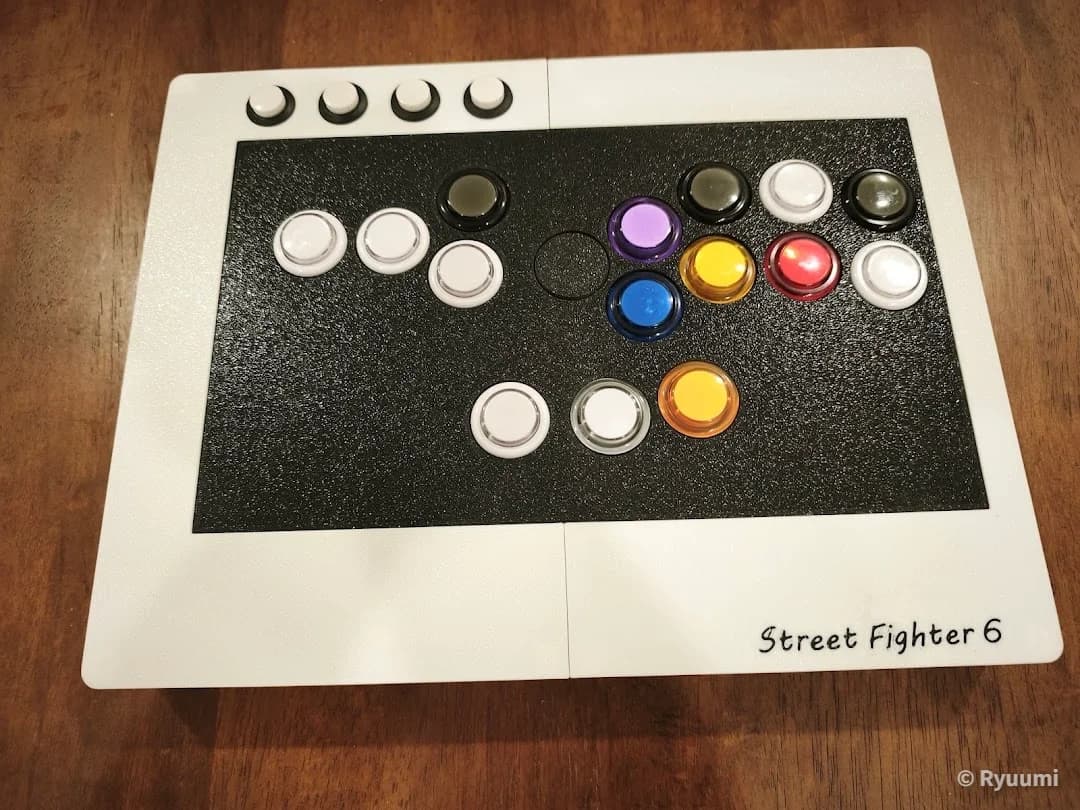
However, when I actually field-tested it in 'Street Fighter 6', harsh realities and areas for improvement came to light. First, the 16mm buttons placed for menus. For use in a PC environment (XInput), five of them were simply unnecessary.

In addition, it's a fact that design flaws were exposed, such as the aforementioned 'top cover trapped by buttons and impossible to swap' issue, and the reliance on an expensive Type-C adapter. That being said, as a first unit built from scratch, it definitely falls into the category of a massive success. These gritty failures and lessons learned are the greatest assets of DIY. I'll fully utilize this data and start designing 'Unit 2', which will overcome all these weaknesses, starting tonight.

The Reality of DIY Learned from Failure: The True Value and Limits of Unit 1 Revealed in Combat

Pushing the printing capabilities of the Bambu Lab P2S Combo to the limit, I thoroughly pursued rigidity and maintainability. From a level of polish that rivals commercial products to the design flaws that were exposed, I review it all mercilessly from a hardcore gamer's perspective.

Related Articles

Return to the Unknown Depths! Trying Out the Subnautica 2 Early Access
Hobby

Return to the Unknown Depths! Trying Out the Subnautica 2 Early Access

For my weekend companion, I chose the highly anticipated Early Access version of Subnautica 2. Breathtakingly beautiful oceans and smooth, comfortable base building. Here is my diary of a relaxing deep-sea exploration.

約3分
Read

Half Price in the Golden Week Sale! A 3-Day Record of Starting 'Street Fighter 6' with a Friend
Hobby

Half Price in the Golden Week Sale! A 3-Day Record of Starting 'Street Fighter 6' with a Friend

We bought 'Street Fighter 6' on a whim with a friend since it was half price during the Golden Week Steam sale. This is a 3-day record of two fighting game beginners aiming for the Platinum rank, full of laughs and tears. Modern Controls are truly amazing...!

5 min read
Read
Building the Custom Leverless Controller Unit 02! The Ultimate Customization Based on Lessons from Unit 01
Tech

Building the Custom Leverless Controller Unit 02! The Ultimate Customization Based on Lessons from Unit 01

The first custom leverless controller was built using a 3D printer. However, putting it into actual combat revealed harsh realities like 'poor maintainability' and 'lack of rigidity.' In this article, we thoroughly identify the flaws of Unit 01 and introduce the redesigned 'Unit 02.'

8
Read